Different versions of StableDiffusion
there are various sub git repositories for StableDiffusion, for example WebUi, ComfyUi, ...
you will find them here
- Installation: Stable Diffusion Web UI by Automatic1111 (+ Deforum Extension)
- Installation: Deforum Stable Diffusion
Installation: Stable Diffusion Web UI by Automatic1111 (+ Deforum Extension)
WebUI: Installation
1. Open a terminal
2. Run the following commands in terminal in this order:
Download the stable-diffusion-webui repository
git clone https://github.com/AUTOMATIC1111/stable-diffusion-webui.gitChange directory and navigate to the Stable Diffusion folder
cd stable-diffusion-webui/models/Stable-diffusion3. Download a Stable Diffusion Model from KISD Model Zoo
Downloading ONE version is enough to get you started.
Stable Diffusion v-2-1 512x512 (base)
wget --no-check-certificate --content-disposition https://th-koeln.sciebo.de/s/Kpgz0TueJYcjY4t/download -O v2-1_512-ema-pruned.ckptStable Diffusion v-2-1 768x768
wget --no-check-certificate --content-disposition https://th-koeln.sciebo.de/s/m3PhfQtlmYOlEUI/download -O v2-1_768-ema-pruned.ckpt4. Change access rights of file webui.sh
Return back to home directory
cdChange directory and navigate to the stable-diffusion-webui folder
cd stable-diffusion-webuiRun this command to assign execution rights
chmod +x webui.sh5. Run webui.sh
./webui.sh --share6. In the terminal code, search for the public URL (Running on public URL: https:// xxxxxxx-xxxx-xxxx-.gradio.live) and copy it to your browser
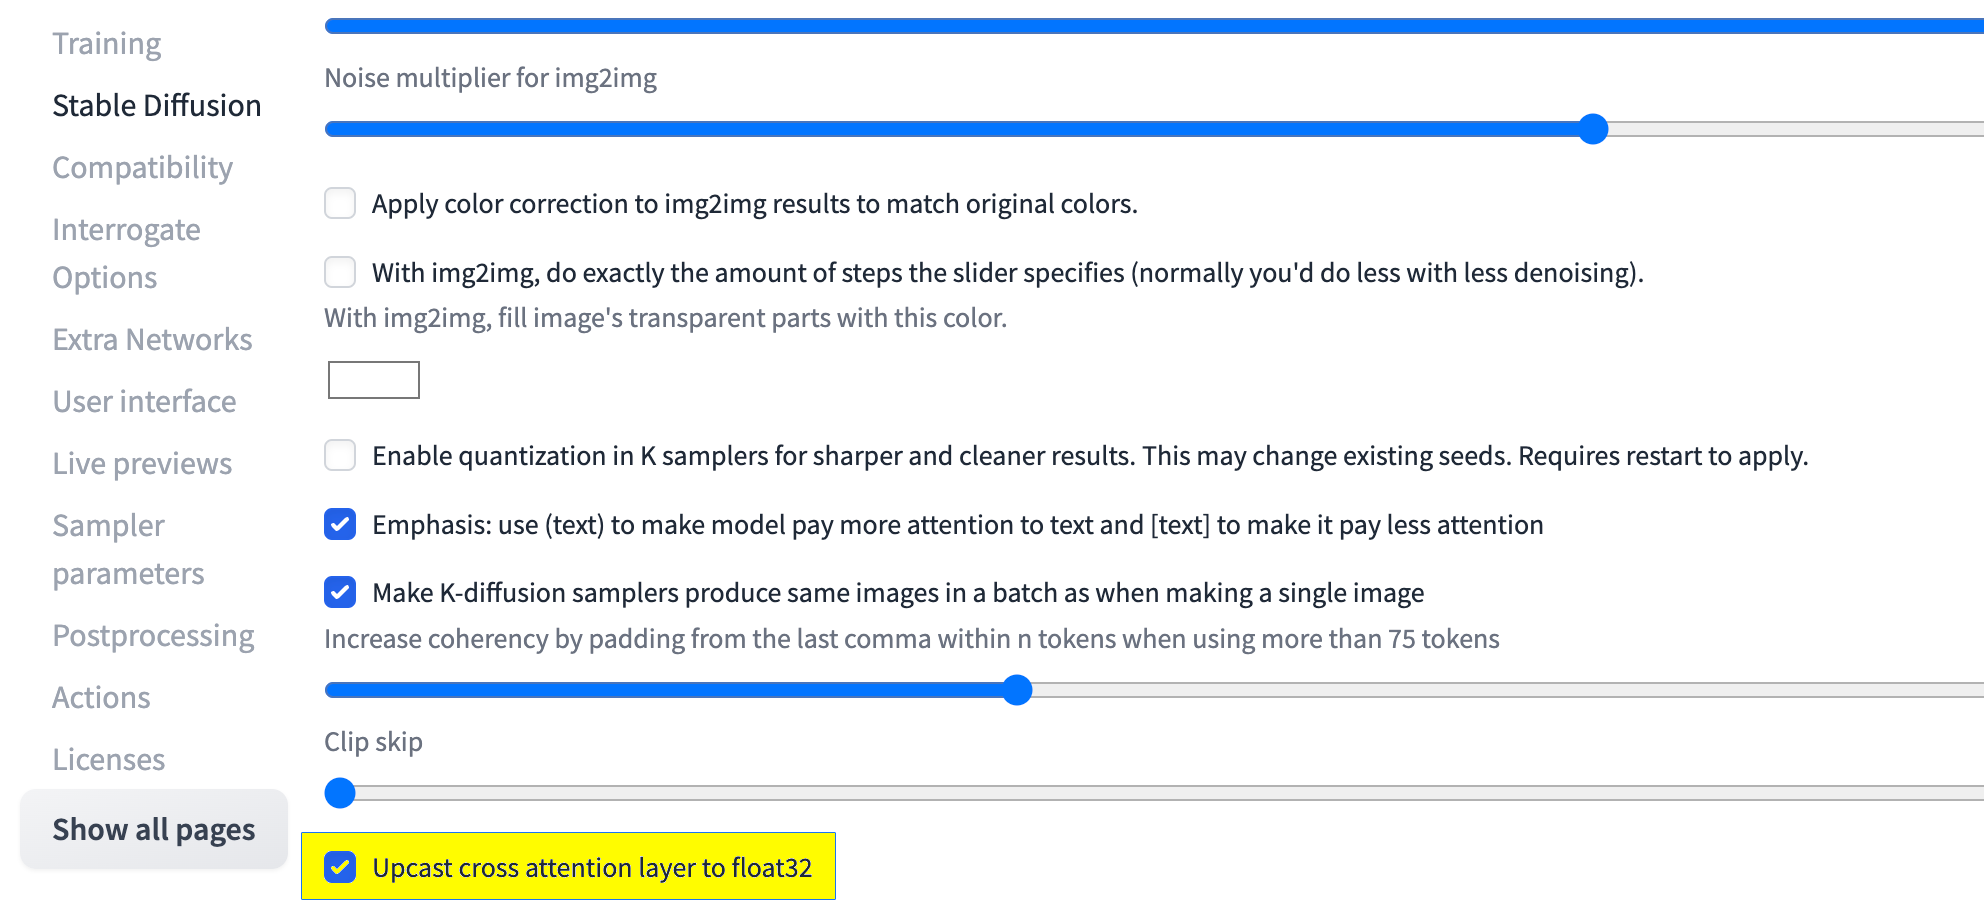
7. If you receive the following error message after trying to generate your first image, in the WebUI go to Settings > Stable Diffusion > & check the box for "Upcast cross attention layer to float" > Apply settings & Reload UI
NansException: A tensor with all NaNs was produced in Unet. This could be either because there's not enough precision to represent the picture, or because your video card does not support half type. Try setting the "Upcast cross attention layer to float32" option in Settings > Stable Diffusion or using the --no-half commandline argument to fix this. Use --disable-nan-check commandline argument to disable this check.
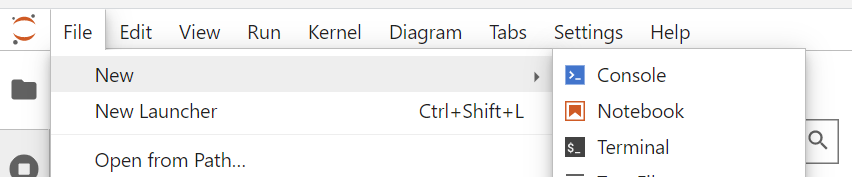
8. At end of use: Within the interface, go to File > Hub Control Panel > Stop My Server
Deforum Extention (Animation for SD): Installation
1. Open a terminal & navigate to the stable-diffusion-webui folder
cd stable-diffusion-webui2. Download the Deforum repository
git clone https://github.com/deforum-art/deforum-for-automatic1111-webui/ extensions/deforumTutorial recommendation: Deforum Settings Explained - Part 1 Stable Diffusion Automatic 1111
Tutorial recommendation: Deforum for AUTOMATIC1111 - Stable Diffusion Tutorial - AI Animation Part 2
After Installation: Running Stable Diffusion WebUI
1. Open a terminal & navigate to the stable-diffusion-webui folder
cd stable-diffusion-webui2. Run webui.sh
./webui.sh --share3. In the terminal code, search for the public URL (Running on public URL: https:// xxxxxxx-xxxx-xxxx-.gradio.live) and copy it to your browser
4. At end of use: Within the interface, go to File > Hub Control Panel > Stop My Server
Tutorial recommendation: Stable diffusion tutorial. ULTIMATE guide - everything you need to know!
Please Note: The original version of this book was created by Laura Wagner. This is merely an update of her work!
Installation: Deforum Stable Diffusion
Installation
Installing DSD locally on a Linux Device
1. clone this repository:
git clone https://github.com/HelixNGC7293/DeforumStableDiffusionLocal.gitCreating the environment
2. in case the environment should be available permanently (yes)
conda config --add envs_dirs /home/jovyan/.conda_envs3. create environment with conda
conda create --name dsd python=3.8.5 -y4. initialize bash shell
conda init bash5. restart shell
source ~/.bashrc6. activate environment:
conda activate dsdDownloading models
cd into models folder
cd modelsDownload model files
wget --no-check-certificate --content-disposition https://th-koeln.sciebo.de/s/QJJm0HoP5JqMYza/download -O sd-v1-4.ckpt
wget --no-check-certificate https://th-koeln.sciebo.de/s/e9GlUImXPvTtJRP/download -O dpt_large-midas-2f21e586.pt
cd ..cd pretraineddownload adaBins
wget --no-check-certificate --content-disposition https://th-koeln.sciebo.de/s/yYEhjskz9yuKotX/download -O AdaBins_nyu.ptcd ..
Making the installations
cd DeforumStableDiffusionLocalpython setup.pyPrompting the Model (Latest Stable Diffusion Weights)
These steps need to be executed in order to activate the environment we installed before
initialize bash shell
conda init bashrestart shell
source ~/.bashrcthen:
conda activate dsdgenerate still images:
python run.py --settings "./examples/runSettings_StillImages.txt"animation:
python run.py --enable_animation_mode --settings "./examples/runSettings_Animation.txt"installation script
git clone https://github.com/HelixNGC7293/DeforumStableDiffusionLocal.git
conda config --add envs_dirs /home/jovyan/.conda_envs
conda create --name dsd python=3.8.5 -y
cd DeforumStableDiffusionLocal
cd models
wget ##############insert adabins
wget --no-check-certificate --content-disposition https://th-koeln.sciebo.de/s/QJJm0HoP5JqMYza/download -O sd-v1-4.ckpt
wget --no-check-certificate https://th-koeln.sciebo.de/s/e9GlUImXPvTtJRP/download -O dpt_large-midas-2f21e586.pt
cd ..
conda init bash
source ~/.bashrc
conda activate dsd
python setup.py
Downloading entire folders
if you want to download an entire folder you need to zip it first:
zip -r example.zip original_folderUpscaling
For upscaling please refer to the ESRGAN Book
https://github.com/xinntao/Real-ESRGAN
-i INPUTPATH
-o OUTPUTPATH
-n MODEL