Workshop
Setup Remote Jupyterhub Notebook
1. Signing into Jupyterhub
Login to JupyterHub with your cluster credentials here
Choose an XS or S slice
make sure to choose cuda 11.7 from the dropdown
2. Installing Stylegan3
conda init bashsource ~/.bashrcgit clone https://github.com/NVlabs/stylegan3.gitcd stylegan3conda env create -f environment.ymlconda activate stylegan3conda install cudatoolkit
pip install torch torchvisionconda install psutil
Training
For training your own datasets, you can follow these steps.
For your own dataset make sure that your training data has the correct resolution. You may use either 1024x1024, 512x512 or 256x256 resolution. The chosen resolution has to match with the pre-existing dataset that you want to train on.
You may start a dataset from scratch, just be aware that generally training your collected images on a pre-existing dataset will usually give better results (and faster ones too).
activating conda environment
this needs to be done before every session if you want to use stylegan
conda init bashsource ~/.bashrcconda activate stylegan3alternatively if you are not able to activate stylegan3 through the terminal on our workstations, you can use the anaconda Navigator and start the terminal with the environment activated:

Dowload Training data
If not done before, set up a new directory for the training data
mkdir trainingdatain the trainingdata folder: set up a new folder (for example called imgs) and upload your images
If you want to download your trainingdata from a sciebo folder, you may use this code. Instead of the given link you may use your own one.
wget --no-check-certificate --content-disposition https://th-koeln.sciebo.de/s/7SzJ55ZroKPf5zY/download -O trainingdata/group01.zipwget --no-check-certificate --content-disposition https://api.ngc.nvidia.com/v2/models/nvidia/research/stylegan3/versions/1/files/stylegan3-t-afhqv2-512x512.pkl -O datasets/stylegan3-t-afhqv2-512x512.pklhttps://api.ngc.nvidia.com/v2/models/nvidia/research/stylegan3/versions/1/files/stylegan3-t-afhqv2-512x512.pkl
Prepare training data
Before training, it is highly recommended to check your dataset through the given stylegan3 check-up. It can resize your images too, although it is usually better to do it before on your own. (Adobe Bridge is a great tool for batch processing.)
python dataset_tool.py --source=trainingdata/imgs/ --dest=trainingdata/group01.zip --resolution=512x512--source= your directory with the given files
--destination= the output directory, dont forget to add .zip at the end
--resolution= resolution you want your images to be saved in. (1024x1024, 512x512 or 256x256 resolution)
start training
python train.py --outdir=~/training-runs --cfg=stylegan3-t --data=~/datasets/afhqv2-512x512.zip --gpus=8 --batch=32 --gamma=8.2 --mirror=1--outdir= direction where you want to save the trained data
--data= your dataset you want to use
--gpus= depends on the gpus you have. usually 1 will be
--batch=
python train.py --outdir=~/training-runs --cfg=stylegan3-t --data=~/trainingdata/(...) --gpus=1 --batch=8 --gamma=2 --snap=20 --resume=~/datasets/afhqv2-512x512.zip
Opening the Python Visualizer
Training
For training your own datasets, you can follow these steps.
For your own dataset make sure that your training data has the correct resolution. You may use either 1024x1024, 512x512 or 256x256 resolution. The chosen resolution has to match with the pre-existing dataset that you want to train on.
You may start a dataset from scratch, just be aware that generally training your collected images on a pre-existing dataset will usually give better results (and faster ones too).
activating conda environment
this needs to be done before every session if you want to use stylegan
conda init bashsource ~/.bashrcconda activate stylegan3alternatively if you are not able to activate stylegan3 through the terminal on our workstations, you can use the anaconda Navigator and start the terminal with the environment activated:
Dowload Training data
If not done before, set up a new directory for the training data
mkdir trainingdataIf you want to download your trainingdata from a sciebo folder, you may use this code. Instead of the given link you may use your own one.
wget --no-check-certificate --content-disposition https://th-koeln.sciebo.de/s/7SzJ55ZroKPf5zY/download -O trainingdata/group01.zipwget --no-check-certificate --content-disposition https://api.ngc.nvidia.com/v2/models/nvidia/research/stylegan3/versions/1/files/stylegan3-t-afhqv2-512x512.pkl -O datasets/stylegan3-t-afhqv2-512x512.pklhttps://api.ngc.nvidia.com/v2/models/nvidia/research/stylegan3/versions/1/files/stylegan3-t-afhqv2-512x512.pkl
Prepare training data
Before training, it is highly recommended to check your dataset through the given stylegan3 check-up. It can resize your images too, although it is usually better to do it before on your own. (Adobe Bridge is a great tool for batch processing.)
python dataset_tool.py --source=trainingdata/group01.zip --dest=trainingdata/group01.zip --resolution=512x512--source= your directory with the given files
--destination= the output directory, dont forget to add .zip at the end
--resolution= resolution you want your images to be saved in. (1024x1024, 512x512 or 256x256 resolution)
start training
python train.py --outdir=~/training-runs --cfg=stylegan3-t --data=~/datasets/afhqv2-512x512.zip --gpus=8 --batch=32 --gamma=8.2 --mirror=1--outdir= direction where you want to save the trained data
--data= your dataset you want to use
--gpus= depends on the gpus you have. usually 1 will be
--batch=
python train.py --outdir=~/training-runs --cfg=stylegan3-t --data=~/trainingdata/(...).zip --gpus=1 --batch=8 --gamma=2 --snap=20 --resume="https://api.ngc.nvidia.com/v2/models/nvidia/research/stylegan3/versions/1/files/stylegan3-t-afhqv2-512x512.pkl"
Opening the Python Visualizer
Python Visualizer
The following script will open the python Visualizer
python visualizer.py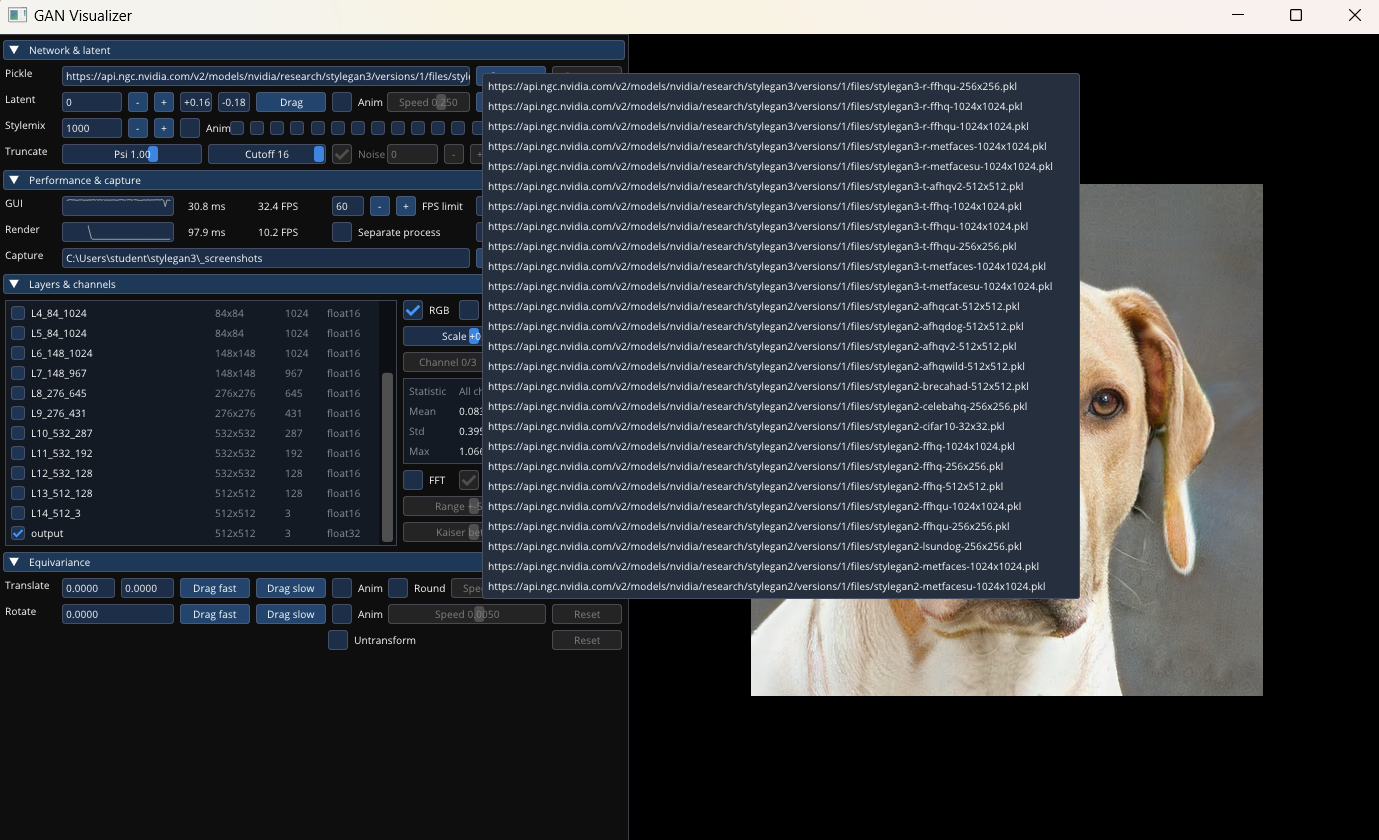
You can open one of the .pkl files that NVIDIA provided or paste a local URL to your own trainingdata to visualize and play around.
...